What is cross stitch?
Cross stitch is a technique of thread embroidery which is very relaxing. It is basically putting X-shaped stitches on fabric with an even and open weave like Aida or linen. Some canvas can be printed (or stamped) which guides you through the colors printed on the canvas. Other kits are more difficult as there is no printed pattern but you would need to count using the pattern design.
At Craftmar, we offer kits including the needed threads, canvas, needle and design. Below are the instructions for counted cross stitch kits (Counted Kits, Bag Kits, Greeting Cards, Bookmarks); stamped/printed (Cushions, Table Covers) ones are simpler to complete with same technique but no need to count.
Step 1: Reading a cross stitch chart
A cross stitch chart in the kit explains you where to stitch and what color to use. The grid on a cross stitch chart corresponds to the grid created by the weave of the fabric, and each colored square on the chart represents a cross stitch.
A combination of colors and symbols in the squares (or symbols only if the chart is black-and-white) tell you which color of floss to use. Use the chart legend to map the symbols to the floss colors.
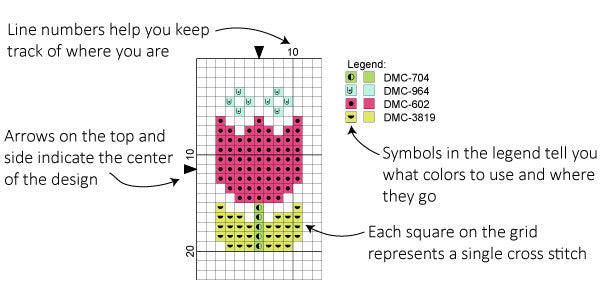
It is always better to start stitching in the middle of the design. That way you make sure your design is centered in the fabric. Small arrows at the edges of a cross stitch chart indicate the center points. Also it is easier to do the bigger areas of color first.
Step 2: Prepare your canvas
Cross stitch can be done on a number of different fabrics, but the most common are Aida and linen. You do not need to cut the canvas in our kits as they came in correct dimension.
Step 3: Find the center of your fabric
To find the center of your fabric, fold it in half one way and then fold it in half the other way. Pinch and crease the center point to mark it. You can place a pin in the center or make a small stitch to further mark the center point.
Step 4: Using a hoop or frame
You can use an embroidery ring which would stretch the canvas and ease your job, especially for beginners. Whether you use one or not is up to you.
To use a hoop, first loosen the screw and separate the two rounds. Place the round without the screw flat on a table or work surface. Lay the fabric over the hoop making sure the center of the fabric is in the center of the hoop. Place the other round over the fabric and press it down so the fabric is sandwiched between the two hoops. Gently pull the fabric taut as you tighten the screw on the hoop. Don’t pull the fabric too tight or it will distort the weave of the fabric.
Step 4: Prepare your thread
Pick the color of floss you are starting with, they are already cut into pieces in our kits.
Step 5: Thread your needle
If you are stitching a kit, use the needle that came with it.
Thread your needle just as you would a needle for hand sewing. Don’t make a knot in the tail end. You will stitch over the tail as you work to secure it without needing a knot. As a general rule, you want to avoid using knots when cross stitching because they can leave lumps in the final piece.
Step 6: Making a row of cross stitches
Cross stitch is generally worked in rows going from left to right. Refer to your stitching chart to figure out where you want to begin stitching.
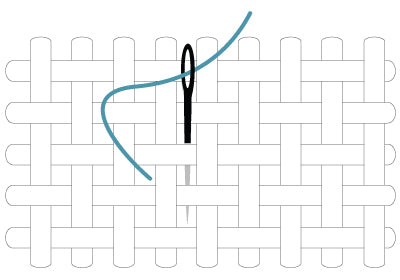
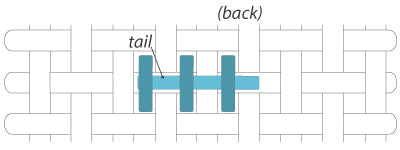
Starting from the back side of the fabric, bring your needle up through a hole toward the front, leaving about an inch of thread at the back. You will cover the tail with your stitches as you work to secure it.
Next pass your needle through a hole diagonally across from where you started to make a slanted half cross stitch (/). Be sure to hold on to the tail at the back of the fabric so it doesn’t slip through.
Start your second half cross stitch by bringing the needle back up through the hole that is directly below the one you last used. Before you pull this stitch tight, flip your fabric over to the back and make sure the thread tail will be trapped by the stitch.
Continuing stitching along the row to make a series of half cross stitches (////).
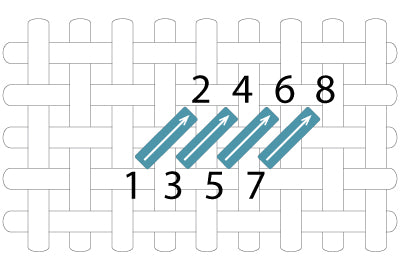
Next return across the row making a series of half cross stitches in the other direction (\\\\).

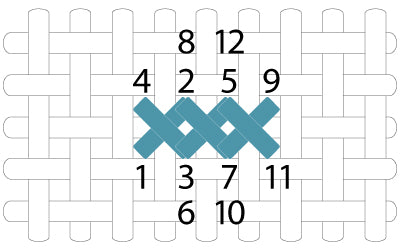
Step 7: Making individual cross stitches
In some places on your design it may be easier to make a complete cross stitch before moving on to the next stitch instead of working in rows. Follow the diagram below to make individual cross stitches.
Step 8: Ending your thread
Keep stitching until you reach the end of the thread or until you run out of stitches in your pattern. On the back side of the fabric, pass the needle under at least three completed stitches to secure the thread. Trim the remaining thread, being careful not to cut it too close.
